Friday 28 December 2018

Recycle your PowerShell scripts in a custom Azure DevOps task

I am a huge PowerShell fan, and pretty much anybody who knows me is aware of that.

Over time I developed my set of scripts for demos and conferences, and some of them are in use in my homelab on a regular basis. One of them is for managing Azure Traffic Manager, and I realised that there is no Azure DevOps task for managing Traffic Manager on the marketplace! Thanks to the brilliant session Utkarsh did at the London Microsoft DevOps Meetup I decided to give a go at at converting that script.

So this is what I did to recycle my script in a task - beware: this post is a crash course on how to do that, and I don't think it is actually anything special. It is just an easy way of productively recycle some existing scripts in a good way. I haven't finished yet - as a good Product Owner I started with an MVP and I see there is more and more to add to it 👀 - but it is slowly coming together and I hope it can be useful to someone in the near future.

What you need to do is create the scaffolding with the tfx cli. from which you can start customising the script.


Then remove any reference to the JavaScript portion of the task - you are just recycling a PowerShell script so you don't need it! It will also save you time when debugging it as otherwise the runner defaults to the JavaScript entry-point. Needless to say, the name of the target script is going to be the name of your script.


Add the VstsTaskSdk module otherwise you are going to get odd errors out. Also, remove any versioning reference. The structure should be .../ps_modules/VstsTaskSdk. This is true for every module you are going to use:


Code-wise, keep the scaffolding as clean as you can, and add your script inside the try statement after the Trace-VstsEnteringInvocation $MyInvocation. You should be able to recycle your script with little changes, of course some adjustment might be needed. If you need to get input parameters you can use the Get-VstsInput command.


Wednesday 19 December 2018

How to authenticate with the Azure subscription you select in a custom PowerShell Azure DevOps task

I will cover more about my custom PowerShell Azure DevOps task, but I wanted to share this quick tip as I struggled as much as the next guy about it...

Say that you want to re-use your PowerShell scripts, and instead of having inline PowerShell tasks you want to package them properly for cross-organisational re-use. It is a relatively easy and straightforward task, but chances are you are going to target an Azure subscription with it and you want to have the nice dropbox and the integrated experience you get with first party tasks.

It is not really difficult, but for some reasons I could not really find an easy walkthrough about that - a limited set of steps, but somehow hard to find...

What you need to do is to import the VstsAzureHelpers  module and include it in the PowerShell modules consumed by your task. Once that is done, you need to make sure you can select the Azure Subscription in the parameters - easy to do as you need to edit the task.json file:


After this you can finally use the Initialize-Azure command in your PowerShell script, which is going to automatically pick the subscription from the parameter and initialise the relevant cmdlets so that you can use stuff like Set-AzureRM... without running Login-AzureRmAccount.


Easier done than said 😀 I hope it is going to be helpful!

Thursday 6 December 2018

Lift and shift migration of Team Foundation Server to Azure with Azure DevOps Server 2019

This is a consequence of the support for Azure SQL Database - as you can use it as a data tier now, you can also upgrade your existing Team Foundation Server instance to Azure DevOps in a lift and shift fashion.

First of all -- *this works on my machine* (lab) and *I bear no responsibilities* 😁 it is highly experimental and only with Azure DevOps Server 2019 RC1 - although I am sure it is going to be polished in the next releases. Let's review the pre-requisites:

  • You need to run domain-joined VM(s)
  • The(se) VM(s) must have a Managed Identity in order to access Azure SQL Database
In order to lift and shift your databases, you need to import them into Azure SQL Database. You can use many methods like the Microsoft Data Migration Assistant, SSMS or a manual import.


It is likely that you need to remove all the Windows users, and the table and stored procedures used for the scheduled backups. Remember that as of now it is still an experimental process - no support whatsoever for this, especially because you are modifying the database manually!


Once the database are imported (S3 tier or above!) you need to run this query on the Azure DevOps databases:

CREATE USER <vmname> FROM EXTERNAL PROVIDER

ALTER ROLE db_owner ADD MEMBER <vmname>
ALTER USER <vmname> WITH DEFAULT_SCHEMA=dbo

Followed by this query in the master database:

CREATE USER <vmname> FROM EXTERNAL PROVIDER

ALTER ROLE dbmanager ADD MEMBER <vmname>

This is it really - then you can launch your Azure DevOps Server Configuration Wizard and proceed to an upgrade. Yes, even if you already installed Azure DevOps Server! Of course there are changes to perform here, so it makes sense to call it as such:


Friday 30 November 2018

Time for a change

Today is my last day at Quest Software and One Identity. Moving on has been a hard-thought decision, after over five and a half years. I met some great people there, and I managed to grow a lot given the different perspective I found myself in after day one.
Working with Vladimir Gusarov was thoroughly great, we've gone through a lot of scenarios and situations but we always managed to get positives out of them.

It is never easy to move on - so many memories and experiences to carry on with you. The company deserves a huge 'thank you!' for this ride, and I can only speak well about them. Thanks!

Now, where am I moving to? Well... I could tease you, but it would be kinda pointless 😊 I am moving back to Avanade, but in the UK branch.

This means I am going to work with a somewhat known group of people - Tarun Arora, Vlatko Ivanovski and Utkarsh Shigihalli for starters. But I will also manage to catch up with people I worked with when six years ago... maybe I should start rehearsing my best version of Terminator's "I am back" 😂

Monday 26 November 2018

Big changes in Azure DevOps Server 2019 - Inherited Processes

Another huge feature brought by Azure DevOps Server 2019 is Process Inheritance - meaning you are going to get the same customisation experience you get today on Azure DevOps Services on your own Azure DevOps Server instance.

It is a collection-wide setting and it cannot be changed once the collection is created, so you won't get it for free when you upgrade to the new version of the product. But there are ways of moving stuff across, and if you do you will get all the benefits from the new model.


Why am I so excited about it? Because as of now, the on-premise customisation was very powerful but also quite complex to master. The Process Template Editor in Visual Studio, witadmin.exe, storing the versioned changes somewhere else, all things that require time and effort, especially when you need to manage an instance that provide a service to your users.

With the new process model customisations can be implemented straight from the Web UI, and finally the concept of process inheritance comes on-premise, making your life much easier.


Once you start using this different approach you will be able to easily apply derived processes to your projects, without going through all the existing fiddling with witadmin or the Process Editor. It is a massive improvement.

Wednesday 21 November 2018

Big changes in Azure DevOps Server 2019 - SQL Azure Database support

This is the first of a (hopefully!) series of posts looking at the substantial new features of Azure DevOps Server, which was released yesterday in RC1.

If you follow my blog you know that despite everything going on around Azure DevOps Services, I have a soft spot for Azure DevOps Server (formerly Team Foundation Server) - the on-premise product.

Why? Well, since it is a quarterly snapshot of the code from the service it seems excellent value in terms of what it offers once brought on-premise!

This is quite an important feature I reckon: Azure DevOps Server now supports Azure SQL Database as the Data Tier.


I can already see you are scratching your head, a little puzzled. Let's put some red lines here, shall we? This configuration works (not "is supported" - works!) only when you are running an Azure DevOps Server instance in an Azure VM. So this is already a huge restriction, but it makes sense - you cannot have better connectivity than something already within the Azure datacentre. After all, on-premise does not necessarily need to be inside a wholly-owned datacentre.

Also, when you create the Application Tier VM(s) you need to assign a System assigned Managed Identity to it - this is how the VM will authenticate with your database, and this is what will enable the Azure option in the deployment screen you saw before.


Also, you need to provision at least two empty databases in advance: the Configuration database (name it Tfs_Configuration, for now) and the main Collection database (again, Tfs_DefaultCollection?). Once you have these two up and running, you need to set an AAD administrator user and assign these roles to your databases:


AT here is the name of the VM, as you are leveraging on the system assigned managed identity. AAD is required to actually manipulate the databases. Also, the first SQL script needs to run only against the master database, while the second one should run against the Configuration database and the Collection database.


What if you don't run these? The wizard put a series of checks in place to prevent a botched configuration. Hence, if you don't run the first script you are not allowing the VM to authenticate against the Azure SQL Database Server, causing this error:


Without the second script you will get an explicit error during the Readiness Checks. Eventually, all databases should run an S3 tier or above, otherwise you will be prevented to configure the instance (for the Configuration database) or you will get various errors and your collection will not be provisioned.


Why all of this? Put yourself in the shoes of someone who deals with a 3TB Collection on a daily basis. Backups, storage, DBCC, hardware performance and high availability. Can you see the reasons why? 😀


Tuesday 13 November 2018

Tips on granular migrations with the Migration Tools for Azure DevOps

As you know, I am a huge fan of Martin Hinshelwood's Migration Tools for Azure DevOps. I've been using them for the past few months, and I put together a list of common occurrences that you are likely to face.

Throttling - it is going to happen!

You cannot do anything about it - you are hitting a cloud service, so it is inevitable that you are going to get throttled because of the irregular shape and the amount of data you are moving. What I can tell you is that if you are migrating an average amount of Work Items (in the low thousands I reckon) you are very likely to hit throttling using the LinkMigrationContext processor because of the load generated on the service.

Correct use of the ReflectedWorkItemID field

I experimented a fair bit with it, and the solution is to actually have it on both ends for the best outcome. Also remember that custom fields in Azure DevOps Services are unique, so don't be tempted to create the ReflectedWorkItemID field in the custom project used by only a project while you will need to re-use it across the board. 
Always create a custom process first - to be used as a starting point for migrated projects that is going to have that field - and then apply that to the target project with whatever further customisation you need.

Split your migrations into core and non-core processors

When do you need your users to be away from the source system? When can they start using the target system? All questions that are going to pop around, sooner rather than later. 
In my opinion if you are performing a Work Item migration they can start working after Areas/Iterations, Work Items and relationship links have been migrated. Why? Because unless you have someone who is really into his/her attachments, that is the main staple of the Work Item Tracking pillar of Azure DevOps.
Every project is different, of course. But these are my notes so they are skewed from my personal experience 😊

Identify what needs to be migrated right now and what can wait

If you have too much data to move and you cannot afford that downtime, you need to change your scope. A feasible approach is to move what is currently active, meaning people can start working right away. Once that is done, you can start batching all the closed items - remember that the WorkItemMigrationContext uses WIQL behind the scenes to identify what is going to be moved, so it is very straightforward.
Doing this makes sure that everything will eventually be migrated, but without the time pressure of the usage downtime. It is just down to coordination.

Sunday 28 October 2018

Why you should scan your code within your pipelines

Like many I received this email from GitHub a couple of weeks ago on an old repository:


This made me think about how important security scanning is in this day and age. Your code might have been top notch a couple of years ago, and being dangerous today.
So, to have a bit of a laugh, I hooked up WhiteSource Bolt to a build of that code to see the actual outcome on the open source libraries used there.
WhiteSource Bolt is also free for Azure DevOps, so there is really little stopping you from scanning your code 😊 this is the (kind of expected result):


This is code from a couple of years ago – do you think your code from two years ago is still as good as it was back then? 😊


Monday 22 October 2018

Unblock the SonarQube upgrade process when using Azure AD plugin for authentication

There is a well known issue with SonarQube's Azure AD plugin, where an upgrade from v6.x to v7.x fails. Fixing this issue involves modifying the Users table manually outside of the upgrade process, and at the moment it is something you cannot avoid.

The reason why this happens is because the external_identity column does not contain a unique value, while instead it is filled with 'Azure AD' for each user. This is not a critical column, and you should be able to do this without issues.

Then I thought about a handy way of fixing this instead of just writing random data in it. Whenever you sign-in with the new plug-in, 'Azure AD' is going to be replaced with your email. So, I put together this very simple script.

Before you run this remember that I bear no responsibilities from it - it worked on my machine, it might not on yours 😊 always test it on backups first!


This takes care of the uniqueness of the value and enables the upgrade to go ahead. Needless to say that this script can be easily added to my proof-of-concept of automated pipeline!

Friday 12 October 2018

A small detail to keep in mind while exporting Build Definitions

As part of a migration process you might want to easily migrate the Build Definitions for your pipelines – you can easily do this by using the Export Definition in your Pipelines:


This will create a .json file you can import in your destination project with all the properties of your build pipeline, but bear in mind that there is no magic going on here: if you import it in a different Team Project, it is not going to automatically re-target your definitions, hence you would be pointing at the old repository and the old branch.


It can be quite worrisome if you are moving stuff across Team Projects while keeping them available – there will be no warning, meaning you will get odd errors like this. You’ve been warned 😊

Tuesday 9 October 2018

Why Universal Packages?

You might have read about the new Universal Package, something I am quite a fan of. There is no need for a huge software system in order to use them: actually I read about the many situations where they come in handy, but I believe I have a great one-size-fits-all example.

We know that Git, a file-system based Version Control System, is not suited for binary storage. The solution I always recommended was to use a TFVC (yes! TFVC!) repository so that you will not only get transactional consistency when consuming these files, but also versioning. 

At the end of the day, these files would be stored in a database hence TFVC fits the bill quite well. But it was kind of a basic solution for this scenario, as it does not offer what Universal Packages do. The whole idea is to create packages to be easily consumed by other users, not fiddle with yet another Version Control System.

Universal Packages not only do this, but they also offer a great deal of compression. Something that is really welcome when it comes to binary files.

My example exactly: let’s say you store media files for your products. Images, videos, stuff that is not textual. You need to consume these files during your pipeline’s execution, in whatever scenario you need them.

Compression (in terms of package size) means performance when consuming them, something that is extremely welcome IMHO. And as you can version packages, you get versioning as well. All by using something that is optimised for that scenario, instead of bending some other sort of technology.

Tuesday 25 September 2018

Should I use GitHub to use the ten free Azure Pipelines?

At yesterday's meetup we got this question: why should I use GitHub to get the ten free parallel Azure Pipelines if I already have a project in the service?

It is an excellent question, and the answer is that you should use GitHub only if you want to. As long as a project is marked as Public in Azure DevOps it will get the ten free pipelines!

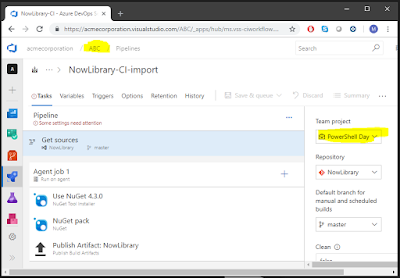
You can verify it yourself: mark a project as Public:


Now browse to the Retention and parallel jobs section of the Build and Release settings menu, and check it yourself under the Parallel Jobs tab - 10 jobs!


Having free Pipelines is not about being forced to use GitHub, it just means you get them as long as your project is public - regardless of the location.

Sunday 23 September 2018

Use the free Azure Pipeline plan with your GitHub project!

It's been a couple of weeks from the Azure DevOps announcement, and I am contemplating an amazing London sunset while I prepare for tomorrow's event.

Before getting distracted by the landscape, I was setting up the free Azure Pipelines offer with a GitHub repository of mine... and I realised how frictionless it is!

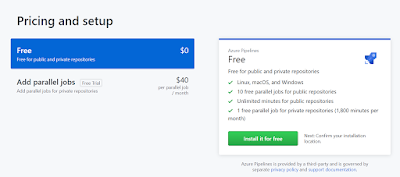
Start from here and select the Free plan:


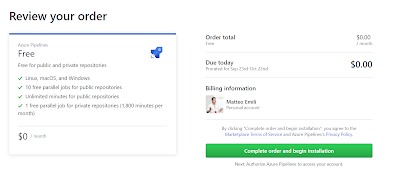
Then select if you want to apply that plan to all your repositories or if you want to use it for select ones:


Now, either select an existing organisation or create a new one, and use a project (in my case a new one called GitHub, but you can use an existing one a well) to refer to the GitHub project. I say refer because the level of interaction with Azure DevOps is kept to a minimum - you are consuming it, but you are not doing anything else with it as of now:

Once you are done, select the template you feel it is closer to your project. In my case I selected a .NET Desktop template because I am building legacy code so it would be the most appropriate:


This will create a yml definition in your repository. Save it, and trigger it - job done!


This was for something I had there since I barely remember when...hence it should not be too difficult to set up Pipelines for your project! 😊

The build is already set up to perform CI and PR validation, so there is little effort other than create it and potentially customise it.

And it is not a joke when we mention the ten parallel free pipelines - they are already there, provisioned for your account!


Monday 17 September 2018

So... what happened to VSTS?


Yes I know – it is a bit of an old news, but I was on holiday and I realised that there are so many crumbs of information around, hence a nice summarising post would help.

On 10th September, Visual Studio Team Services became Azure DevOps. First things first: does this mean that now you cannot target on-premise, AWS or GCP? You couldn’t be more wrong – there is no change on that front. You are free to use any technology and to target any environment with it, it just happens to fall under the Azure umbrella.

I personally feel that the new name, despite being a huge change, underlines the fact that the stack is a business driver, not just a development tool. If you are an existing VSTS Azure DevOps user, what changes for you is how the product is packaged – if you had to get all of the VSTS Azure DevOps services before, now you can choose what to actually get: Boards, Pipelines, Repos, etc.
So you will get a nice per-project selector:

This means that if you want to use an Azure DevOps project just for the Work Item Tracking features and completely hide the Repos, you can totally do that.

Also, the whole UX changed. For the better, I reckon – I find it much improved in pretty much all areas, it just feels better to use. The URL formatting changed (from <org>.visualstudio.com to dev.azure.com/<org>), but it won’t break anything – Microsoft is well aware of this, and it is not going to touch the URLs for the foreseeable future.

Then, the elephant in the room – the open-source offering for Azure Pipelines. When I first heard about it, I had to double check I was not making a mistake. Ten free parallel jobs (effectively it is like having ten build machines) with unlimited minutes for OSS projects, regardless of what technologies you use. The agents run on Windows, Linux and MacOS, making it really cross-platform and open to everyone.

Put aside technology for a moment, and think about it. Ten parallel builds with unlimited minutes, for free. It would a relevant cost that is completely slashed away, making end-to-end OSS delivery as easy as drinking a cup of coffee. I believe it is quite unprecedented, and kudos to Microsoft for offering this.

Eventually, Team Foundation Server is going to be renamed to Azure DevOps Server from the next major release. No other changes on that front, it is still a regular snapshot of Azure DevOps brought on-premise. And no, I don't think it is going to be discontinued anytime soon!

That’s it in a nutshell. It’s a large revamp, but the underlying pillars are still there. Enjoy it!


Monday 20 August 2018

A collection of SQL Server-related tips for the TFS Administrator


If you run Team Foundation Server on-premise, understanding how SQL Server works on the Data Tier is extremely important. Despite the push for the cloud, there might be so many reasons why you need to stick with your on-premise installation of TFS – and the bigger the instance is the more SQL Server knowledge you will eventually need.

I am not a SQL Server expert myself, but between my past as a consultant and now being in a position where I administer a huge TFS instance meant that sooner or later I had to deal with SQL Server on a one-to-one basis. Not always the happiest of encounters to be fair 😊 but still, I learned a lot. So I thought that if you are in my position – where you might be the TFS Administrator – then hopefully a collection of notes I took over time might be handy for you.

SQL Server always wins – be prepared for it – and never, ever touch the databases

It’s not really a tip, but something to keep in mind: given that Team Foundation Server is essentially a product where you have web services in front of a set of databases, hence if the databases have problems the whole product is down. Remember that – when something goes (very) wrong, keep in mind the Data Tier, sometimes it is silly stuff like the drive where the master database resides being full…
Also, never, ever touch the databases manually unless instructed by the Microsoft Support Team. Don’t be tempted to optimise the databases, the number of things that can go wrong is simply too high to risk being in a corrupted state or unsupported situation. Don’t do that.

Use the TFS Administration Console built-in backup tool if you can

The temptation of letting someone else (the IT department, a DBA, etc.) deal with the menial task of backing up your Data Tier can be very high, but if you can just use the built-in backup tool. It makes it transparent to you and takes away the hassle of creating maintenance plans.
If you have databases in Full Recovery Mode, it will take care of your Transaction Logs backup in an atomic manner – it is very important. If you take backups at different times for example, you might end up in a situation where you have identities in a Collection database which does not correlate with the Configuration database. To avoid this, you should mark your transactions as part of your backup plan.
Also don’t forget to backup your SSRS Encryption Key, otherwise you might be restoring a useless set of databases in a Disaster Recovery scenario!

High Availability means AlwaysOn!

To be fair it is not really the case, but it makes your life so much simpler. AlwaysOn makes Highly Available deployments a breeze, and even if you have to factor in some adjustments to your habits it is worth it every single time.
Beware though: even if you implement AlwaysOn for your Database Engine, you will not get Analysis Services for free on the same setup – that is a different deployment altogether.

Keep an eye on your drives

This is something I experienced fairly recently – aside from the usual recommendation on where to put your databases (system or otherwise), if you have a very large database you could run into file system limitations that prevent DBCC CHECKDB from running and make you lose sleep. If you happen to experience these, it is worth knowing that not everything is lost and you might not even need to restore from a backup.
NTFS has a switch (/L) that is designed around large files, it is an excellent starting point although you need to format your drives. Another solution revolves around using ReFS instead of NTFS – it is something somehow unknown, but after running it for a while in my homelab and using it to solve a portion of this problem I can say that ReFS is a powerful “tool” (I can’t really consider a file system a tool, but for lack of a better word…) to resort to in case you find the dreaded error 665 in your logs.

Remember to check what is going on

I use this couple of queries since… I don’t know, ages. They help, because they show in a transparent way what is going on within a SQL Server instance (especially if you need to understand what AlwaysOn is doing) and they provide information that can help diagnosing certain errors.


Thursday 9 August 2018

How VSTS Sync Migrator is going to change then way you migrate to VSTS

Like I said in my last post, I really enjoy using VSTS Sync Migrator for Work Item migrations.
There are a few reasons why I believe this tool stands out from the rest, and it is not just because of its complexity - in a nutshell, you can use it not just for tip migrations, but to actually filter and sanitise what you are importing into your target TFS or VSTS.

Firstly, you can run each processor (call them steps if you want) independently. That is very important when it comes to understanding what each one of them does. You don't really want to use something that starts, does stuff and then fails with an enormous log file.

Each processor is extremely specialised and usually backed by a WIQL - again, quite complex sometimes but extremely powerful and flexible.

You can also run multiple instances of the Migrator, targeting different Team Projects in VSTS - having them side by side isn't usually a problem.

Then, you have a really powerful capability for shaping your data in the best possible way. By "shaping" I mean "mapping": field to field, replacing values, even replacing values via Regular Expressions or mapping different Work Item Types.

This can enable all sorts of scenarios where you can change a Process Template, or make your very verbose customised form much more readable by merging or moving around fields' data.


Eventually, no ancillary item is left behind, including Work Item Queries (which carry a huge business value IMHO) and commit information. You can link commits to Work Items even if you migrated the repository with a different name.


It takes a while to get all the bits right - there are lots of options, but the documentation is quite good and it will easily guide you through. Fellow MVP Mohamed Radwan also recorded a quick demo of how to use it.

Now, onto more VSTS migrations 😀

Tuesday 31 July 2018

A set of tools to deal with granular VSTS migrations

I am in the middle of a TFS to VSTS migration, and unfortunately I cannot use the TFS Database Import Service this time around. So I put together this list of tools to use for a granular migration, together with scenarios.

It is going to be mostly on the Work Item side to be fair - if you want to move code quickly look at the last post.

TFS Integration Platform

Yes, I start from the oldest of the bunch. While unsupported and fairly old, the Integration Platform still works decently given the chance. 

There are lots of limitations though: you are limited to the Client OM, and you need some tricks to make it work, like creating fake registry entry to make it believe you actually have Team Explorer 2012 (unless you install it, of course).

I reckon the Integration Platform these days works well with a limited scope migration. The pain here is that everything needs to be sorted manually and it gets sluggish after a while, for some reason.

TfsCmdlets

Say that you want to quickly work with Areas and Iterations, or that you want to script them. This is an example where the TfsCmdlets are extremely powerful. 

In my case, I am using them extensively to prepare empty target Team Projects. It is basic PowerShell, hence you can manipulate your objects as you like and they make your life extremely easy.

You don't migrate stuff with the TfsCmdlets, but it is a really invaluable tool for all the ancillary items around the migration itself.

VSTS Work Item Migrator

The Work Item Migrator is an open source project from Microsoft that leverages the REST API layer of TFS and VSTS.

It is more of a sample of how to deal with the APIs IMHO, but it is an excellent starting point. It is based off a Work Item Query as a source, which means you can easily scope what you want. Areas and Iterations need to be created beforehand.

One note here: if the validation succeeds, it is not guaranteed that the tool will migrate everything, but that depends on many factors.

VSTS Sync Migrator

Martin Hinshelwood's VSTS Sync Migrator is a real powerhouse - it is quite complex and it has lots of features (including reconnecting commits to Work Items), it can take a little while to refine the result but it is great.

You can also do remaps with this tool, so you can easily migrate from one Process Template to another. It is easy to do because you will configure it yourself in the configuration file. What I really like about this tool is that I can have a very complex configuration but keep some of the steps in a disabled state - so I can have a nice incremental experience.

Tuesday 17 July 2018

I want to move my project from TFVC on TFS to Git on VSTS, without command-line tools. Can I do it?


Many often do not realise how easy is to consume technology to make it accomplish a certain scenario. This happened just last week to me.

For example: you have a project on a Team Foundation Server, which uses TFVC. TFS is only available via the corporate LAN, while you want to move it to the new company’s VSTS account and you also want to move to Git. Throwing an extra spanner in the works, you want something easy to use which does not require any kind of command-line use.

Does it sound too complicated? It is actually a matter of a couple of clicks.

The first step is to use the Import Repository feature on your local TFS – what you will do is to convert a branch from TFVC ($/MyProject/main for example) to a new Git repository:


You can retain as much as 180 days of history, which is more than enough IMHO. If you need more, you can keep the old system around and look it out there. Why? Because of how TFVC and Git differ – it would not really make sense, and you are just adding stuff to a repository that should be as nimble as possible. Also, you are limited to 1GB per imported branch.

Once you are happy with it you can add your VSTS target repository as a remote, and push it there. Job done.

Tuesday 10 July 2018

Review – Accelerate


As you know, I am not only a technology enthusiast but also very into the business side of DevOps. And as a fan of The Phoenix Project, I really could not refrain from purchasing it 😊 
Also, the focus is on High Performing Technology Organisations (HPTO from now on), which is a very broad subject intertwining technology, management, strategy. Enough to keep me interested.


I read it twice before writing this review. Yes, twice. And the conclusion is very simple: it carries a huge horizontal value. This book is not the typical technical or business book, its approach is more scientific, almost academic.

A real HPTO is a well-oiled machine that requires lots of work all across the board. And that is where it shines for business value: despite this approach, the result is that each chapter can be picked by any company as a project on its own to improve itself and go towards the required maturity to ‘be’ an HPTO.

Technical best practices? Chapter four. Infosec and the shift left on security? Chapter six. Employee empowerment through management? Chapter nine. Each chapter has enough stuff to keep you, your teams and your companies busy for months, if you actually start a project on it. And given that I do not think every reader of this book works in a HPTO, you definitely should start some projects 😊

Summarising it in a single sentence, the issue at heart is that software is the actual business engine. That is what the book underlines as well - without a good software factory you simply cannot deliver value to your users, and if you don’t deliver value…

Wednesday 27 June 2018

A set of tricky situations with HTTPS and TFS

HTTPS is more and more common-place, not just for public websites but also for internal websites. This is extremely good for a number of reasons, but from an administration standpoint there are a few bits to keep in mind.

In particular, when it comes to Team Foundation Server this is a list of errors and problems that go away with a common denominator: the right certificate.

The number one offender is of course the out-of-domain machine. If you have a domain-joined machines these problems simply do not happen because the internal certificate is deployed by the domain GPO - hence you don't have to fiddle with it. When your machine is not domain-joined, things can easily go south.

Bear in mind - these are not security tips, this is just a collection of situations which you will face if you deploy HTTPS with TFS.

Non domain-joined machines

If you are running a non domain-joined machine then you need to procure the root certificate for your domain and install it in the Trusted Root Certification Authorities store on your machine. This needs to be done on any machine not part of your domain, otherwise you won't be able to do pretty much anything.


Build agents

Build agents need to be reconfigured. You can't run away from this, if you don't do that they will be working until the authentication token expires, and then you will start seeing this error in the Event Log after they go offline:

Agent connect error: The audience of the token is invalid.. Retrying every 30 seconds until reconnected

You need to de-register (config.cmd remove) and re-register your build agents in any pool. Not too bad, but it needs to be planned for.


The Deploy Test Agent task in Build and Release

If you don't have your certificate installed on both the Agent (if outside the domain) and the target machine (again, if outside the domain) then you will get this cryptic error:

The running command stopped because the preference variable "ErrorActionPreference" or common parameter is set to Stop: Exception calling ".ctor" with "2" argument(s): "One or more errors occurred."

It's a communication issue between the target machine and TFS. Once the certificate is installed it goes away and the task works normally. This GitHub issue also recommends enabling TLS v1.2, which is not a bad idea.


 Git

Git holds a special spot in this collection, because of how it handles SSL. While newer versions of Git for Windows made this really straightforward (hint: they support the Windows Credential Manager), but if you aren't running the latest and greatest then this is what could happen with Git on your local machine, even if it is joined to the domain:

C:\>git clone https://myserver/Collection/_git/Project 
Cloning into 'Project'... 
fatal: unable to access 'https://myserver/Collection/_git/Project/': SSL certificate problem: unable to get local issuer certificate

You can sort this out in many ways, but the best one is Philip Kelley's approach. It just works, even if it is a bit of a walkthrough. This applies not only on the client, but also on the build agent if you are not running a recent version of the agent itself. It can be easily corrected by replacing the ca-bundle.crt file over there, it is not going to be replaced until you update the agent to a newer version.

Also, a false friend:

error: RPC failed; curl 56 OpenSSL SSL_read: SSL_ERROR_SYSCALL, errno 10054
fatal: read error: Invalid argument, 255.05 MiB | 1.35 MiB/s
fatal: early EOF
fatal: index-pack failed

It can be all sorts of things, especially as the error points at OpenSSL - but check your connection's stability first before messing up with Git's postBuffer and compression 😃 if the git clone operation starts the problem is not the SSL authentication.

Wednesday 20 June 2018

Easily handle internal settings while orchestrating components' deployments and parameters

After ten years of attending, then speaking at conferences it always strikes me what demos often miss are real world details that really make the difference.

Like...deploying an application with a pipeline. Everybody talks about it, right? And everybody (including myself!) have some demo-ready stuff to show around in case it might be required.

I am working on a sample application right now, and I realised how blind I was - even if I am deploying stuff to different slots and environments and whatnot, I am still treating everything as a single monolith. Not really what you want these days, right?

Well' let's sort it out. Say that you have an API component and a Frontend component, the best thing to do is to decouple the two of them so they can be independently deployed *and* mix-matched depending on the requirement.

It is .NET Core in my case, so in my Frontend component's appsettings.json I created this section:


Of course I modified the application so I could add the configuration in my ConfigureServices method and consume it in my Controller. The variable part in this case is the Slot property.

Now comes the fun side of the story - of course I have a pipeline in place. How do I handle these settings?


The best approach here, given the relative complexity of this exercise, is to scope the relevant value by environment. The Dev environment will always point at the Dev environment, Staging to Staging, and the last two environments are effectively production so I do not need to worry about adding a slot. It's not like I have cross-environment settings here.


The reason why the variables are named that way is because I am using the JSON variable substitution option in the Azure App Service Deploy task, and as my property is not on the first level then it needs to be explicitly written that way.


Doing it ensures that each environment has its own setting, and it also makes sure you remain sane while handling internal app settings across your applications and environments 😉 it is really easy to do as well, so there is really no reason to skimp on it.

Saturday 16 June 2018

Quickly deploy a baseline SQL database with VSTS

"Sometimes we go full steam ahead with a complex solution for a very simple problem..."

That was the answer I gave to a friend of mine who asked me how to feed some baseline database for testing purposes with VSTS in Azure.

The obvious one would be to have your versioned SQL scripts in a dedicated repository which you can use to rebuild the whole thing from code (which is by all accounts the most correct solution to this problem). But in this case there are other avenues.

Databases have been treated like second class citizens for years - by tools and practices. For example, why not using BACPAC files for this exercise? At the end of the day, a BACPAC file contains the packaged version of a database at a certain point in time, including its data.

So if you have your BACPAC somewhere, get to an Azure storage account and run this SQLPackage command inside a VSTS PowerShell Script task (of course you need to replace the variables and provide the actual path):

& 'C:\Program Files (x86)\Microsoft Visual Studio\2017\Enterprise\Common7\IDE\Extensions\Microsoft\SQLDB\DAC\130\sqlpackage.exe' /Action:Import  /TargetServerName:$(DBUrl) /TargetDatabaseName:$(DBName) /TargetUser:$(DBAdmin) /TargetPassword:$(DBPassword) /SourceFile:"<your location>/sample.bacpac"

Don't get me wrong, I love seeing a database fully integrated with the pipeline and that's how it should be. But in this specific case, I feel the tradeoff is worth it.

Also - this is a baseline database, nobody prevents us from running delta scripts against it depending on needs. But given it was for testing purposes, I highly doubt there is going to be much development on it in the future!

Thursday 7 June 2018

How to run UI tests in a Deployment Group with TFS and VSTS

Especially if you are testing client applications, you might want to run UI tests on a Deployment Group instead of a Build Agent. While technology is the same, there are a couple of things to keep in mind.

In order to enable a machine to run UI tests you need to make sure your InteractiveSession capability is set to true.


In order to do so, you need to re-configure or manually change the script used to add a machine to the Deployment Group. Given a standard script the first step is removing the --runasservice switch from it.

Once you run the configuration script the process will guide you to configure the agent for interactive interaction. You will set it to auto-start so you will get an unattended experience when rebooting the machine, but you will be able to run interactive sessions on it.

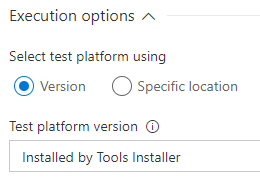
Eventually, I always recommend to use the VSTest Platform Installer task to make sure you have a consistent environment to run your tests from:


and to refer to the tools installed by that in the Visual Studio Test task: